听阳光的猫

道阻且长、望你如一

0%

CSS属性

一. 认识CSS

CSS提供了3种方法,可以将CSS样式应用到元素上

内联样式(inline style)

将样式直接写在元素的style属性上

CSS样式之间用分号;隔开,建议每条CSS样式后面都加上分号;

在很多国内外资料中,“CSS样式”与“ CSS属性”是同义词

样式名 -> 属性名
样式值 -> 属性值

1
2
3
4
5
6
7
8
<body>
<!-- 1.内联(行内)样式: inline -->
<!-- <h1 style="属性名: 属性值;属性名: 属性值;">网页的标题</h1> -->
<h1 style="font-size: 50px; color: red;">网页的标题</h1>
<p style="color: red;">网页的段落</p>
<a style="color: red;" href="#">百度一下</a>
<div style="font-size: 20px; background-color: red;">哈哈哈</div>
</body>

文档样式表(document style sheet)

将样式写在head元素的style元素中

<style>元素的type属性值默认是text/css

1
2
3
4
5
6
7
8
9
10
11
12
13
14
15
16
17
18
19
20
21
22
23
24
25
26
27
28
29
30
31
32
33
34
35
36
37
38
    <style>
/*
快捷键: ctrl + /
选择器 {
属性名: 属性值
}
*/

/* 单个选中h1元素 */
h1 {
font-size: 50px;
}

div {
font-size: 20px;
background-color: red;
}

/* 并集选择器 */
h1, p, a {
color: red;
}

/* 类选择器 */
.red {
color: red;
}
</style>
</head>
<body>
<!-- 文档样式表: document style sheet -->
<!-- 开发网页特性: 结构和样式分离 -->
<!-- 注释: ctrl + / -->
<h1>网页的标题</h1>
<p>网页的段落内容</p>
<a href="#">百度一下</a>
<div>呵呵呵呵</div>
</body>

外部样式表(external style sheet)

将样式写在单独的CSS文件中,然后在当前网页的head元素中用link元素引用

<link rel=”stylesheet”>元素的type属性值默认是text/css

在CSS文件中使用@charset指定文件编码,一般都是UTF-8

1
2
3
4
5
6
7
8
9
10
11
12
13
14
15
16
17
18
19
    <!-- link引入样式: rel="stylesheet" -->

<!-- 1.使用link引入 -->
<!-- <link rel="stylesheet" href="./css/base.css">
<link rel="stylesheet" href="./css/style.css"> -->

<!-- 2.style -> @import -->
<style>
/* @import url(./css/base.css); */
@import url(./css/style.css);
</style>
</head>
<body>
<!-- 外部样式表: external style sheet -->
<h1>网页的标题</h1>
<p>网页的段落内容</p>
<a href="#">百度一下</a>
<div>呵呵呵呵</div>
</body>

@import

可以在style元素或者CSS文件中使用@import导入其他的CSS文件

不建议使用@import导入CSS文件,它的效率比link元素低

HTML和CSS的编写准则

结构、样式分离

因此,不要使用HTML元素的属性来给元素添加样式

比如body的bgcolor、img的width\height等

1
2
3
4
5
6
7
8
9
    <style>
.product-item {
width: 100px;
}
</style>
</head>
<body>
<img class="product-item" src="../img/test_01.webp" alt="">
</body>

设置网页图标

link元素除了可以用来引入CSS文件,还可以设置网页的图标(href的值是图标链接)

link元素的rel属性不能省略,用来指定文档与链接资源的关系

一般rel若确定,相应的type也会默认确定,所以可以省略type

网页图标支持的图片格式是ico、png,常用大小是16x16、24x24、32x32(单位:像素)

CSS官方文档

官方文档地址
https://www.w3.org/standards/techs/css
https://www.w3.org/TR/CSS22/
https://www.w3.org/TR/CSS22/propidx.html

由于浏览器版本、CSS版本等问题,有些CSS属性是无法使用的
可以到https://caniuse.com/查询CSS属性的可用性

二.选择器(selector)

通用选择器(universal selector)

元素选择器(type selectors)

类选择器(class selectors)

id选择器(id selectors)

属性选择器(attribute selectors)

组合(combinators)

伪类(pseudo-classes)

伪元素(pseudo-elements)

通用选择器(univeral selector)

所有元素 *

一般用来给所有元素做一些通用设置

比如:内边距、外边距

  • 效率低,尽量不使用
1
2
3
4
5
6
7
8
9
10
11
12
13
14
15
16
17
18
19
20
21
22
    <style>
/* 通用选择器 */
/* * {
color: red;
} */

div, p, span, strong {
background-color: red;
}

* {
margin: 0;
padding: 0;
}
</style>
</head>
<body>
<div>我是div元素</div>
<p>我是p元素</p>
<span>我是span元素</span>
<strong>我是strong元素</strong>
</body>

元素选择器(type selectors)

或者叫做标签选择器

1
2
3
4
5
6
7
8
9
10
11
12
13
14
15
16
17
18
19
20
21
    <style>
div {
color: pink;
}

p {
color: yellow;
}

a {
color: green;
}
</style>
</head>
<body>
<div>文字内容1</div>
<p>文字内容2</p>
<a href="#">文字内容3</a>
<div>文字内容4</div>
<div>文字内容5</div>
</body>

类选择器

一个元素可以有多个class值,每个class之间用空格隔开

class值如果由多个单词组成,单词之间可以用中划线-、下划线_连接,也可以使用驼峰标识

最好不要用标签名作为class值

1
2
3
4
5
6
7
8
9
10
11
12
13
14
15
16
17
18
19
20
21
22
23
24
25
26
27
28
29
30
31
32
33
34
35
36
37
38
39
40
41
42
    <style>
/* 1.设置文字颜色相关 */
div {
color: red;
}

.box1 {
color: green;
}

.box2 {
color: pink;
}

.box3 {
color: purple;
}

/* 2.设置文字的大小: 文字2和文字4大小是25px */
.large-font {
font-size: 25px;
}
</style>
</head>
<body>
<!--
类的名字规范:
1.尽量见名之意
2.当多个单词时, 以什么样方式连接
* - 连接: large-font
* _ 连接: large_font
* 驼峰连接: largeFont
-->
<div class="box1">文字内容1</div>
<p class="large-font">文字内容2</p>
<a href="#">文字内容3</a>
<!-- 强调: 一个元素是可以有多个类的, 多个类以空格进行分割 -->
<div class="box2 large-font">文字内容4</div>
<div class="box3">文字内容5</div>
<div class="box2">文字内容6</div>
<p>文字内容7</p>
</body>

id选择器

一个HTML文档里面的id值是唯一的,不能重复

id值如果由多个单词组成,单词之间可以用中划线-、下划线_连接,也可以使用驼峰标识

最好不要用标签名作为id值

1
2
3
4
5
6
7
8
9
10
11
12
13
14
15
16
17
18
19
20
21
22
23
24
25
26
27
28
29
30
    <style>
#header {
color: red;
}

#content {
color: green;
}

#product {
color: yellow;
}

#footer {
color: blue;
}
</style>
</head>
<body>
<!-- 强调: id名称在同一个页面中不要重复(代码规范) -->
<div id="header">头部</div>

<div id="content">内容</div>

<div id="product">商品</div>

<div id="footer">尾部</div>

<!-- <p id="header">p元素</p> -->
</body>

三.常用CSS属性

文本:color、direction、letter-spacing、word-spacing、line-height、text-align、text-indent、text-transform、text-decoration、white-space

字体:font、font-family、font-style、font-size、font-variant、font-weight

背景:background、background-color、background-image、background-repeat、background-attachment、background-position

盒子模型:width、height、border、margin、padding

列表:list-style

表格:border-collapse

显示:display、visibility、overflow、opacity、filter

定位: vertical-align、position、left、top、right、bottom、float、clear

最常见CSS属性

CSS属性-background-color

用来决定背景色

CSS属性-color

用来设置文本内容的前景色(文字颜色)

包括文字、装饰线、边框、外轮廓等的颜色

CSS属性-width

宽度

CSS属性-height

高度

CSS属性-font-size

文字大小

1
2
3
4
5
6
7
8
9
10
11
12
13
14
15
16
17
18
19
20
21
22
23
24
25
26
27
28
29
30
31
32
33
34
35
36
37
38
39
40
41
42
43
44
45
46
47
48
49
50
51
52
53
54
55
    <style>
/* 1.color: 前景色 */
.box1 {
color: green;
text-decoration: underline;
border-width: 10px;
border-style: solid;
}

/* 2.font-size: 文字的大小 */
/* em rem 百分比 */
.box2 {
font-size: 30px;
}

/* 3.background-color: 背景颜色 */
.box3 {
background-color: greenyellow;
}

.title3 {
background-color: skyblue;
}

/* 4.width/height: 宽度和高度 */
.box4 {
background-color: orange;
width: 300px;
height: 300px;
}

.title4 {
background-color: purple;

/* 无效的: 宽度和高度不适用于非替换行内元素 */
width: 300px;
height: 300px;
}
</style>
</head>
<body>
<!-- 1.color: 前景色 -->
<div class="box1">哈哈哈哈哈</div>

<!-- 2.font-size: 文字的大小 -->
<div class="box2">呵呵呵呵呵</div>

<!-- 3.background-color: 背景颜色 -->
<div class="box3">嘻嘻嘻嘻嘻</div>
<span class="title3">嘿嘿嘿嘿嘿</span>

<!-- 4.width/height: 宽度和高度 -->
<div class="box4">哇哇哇哇哇</div>
<span class="title4">bbbbbbbbbbb</span>
</body>

颜色

基本颜色关键字

red:红色,black:黑色,yellow:黄色,blue:蓝色,purple:紫色,white:白色

只提供了上百种基本颜色的关键字

RGB颜色

通过R(Red)、G(Green)、B(Blue)三种颜色通道的变化、叠加产生各式各样的颜色

  1. 十六进制表示形式

    #rrggbb,每一种颜色取值范围00~FF,大小写都可以

    #ff0000:红色,#00ff00:绿色,#0000ff:蓝色,#000000:黑色,#ffffff:白色,#ffff00:黄色

  2. 十进制表示形式

    rgb(red, green, blue),每一种颜色取值范围0~255

    rgb(255, 0, 0):红色;rgb(0, 255, 0):绿色;rgb(0, 0, 255):蓝色;rgb(255, 255, 0):黄色;rgb(0, 0, 0):黑色;rgb(255,

    255, 255):白色

  • 建议:尽量使用#rgb取代#rrggbb,比如使用#345取代#334455

    可以缩减CSS代码的体积,从而减小文件大小,节省用户流量,加快网页响应速度

RGBA颜色

RGBA颜色在RGB颜色的基础上加了个alpha,实现带有透明度的颜色

rgba(red, green, blue, alpha)

alpha取值范围是0.0~1.0

0代表完全透明,1代表完全不透明

  • 关键字transparent等价于rgba(0, 0, 0, 0),完全透明
1
2
3
4
5
6
7
8
9
10
11
12
13
<style>
div {
width: 200px;
height: 200px;
/* background-color: rgb(255, 128, 0); */
background-color: rgba(0, 255, 0, 1);

/* background-color: rgb(255, 128, 0); */
/* 转成16进制的写法 */
background-color: #00ff00;
/* background-color: transparent; */
}
</style>

四.文本属性(text)

text-decoration

none:无任何装饰线(可以清除a元素的下划线)

underline:下划线

over line:上划线

line-through:中划线(删除线)

  • u、ins元素默认就设置了text-decoration为underline

letter-spacing、word-spacing

letter子母间距

word单词间距

  • 默认值是0,可以设置为负数

text-transform

用于设置文字的大小写转换

capitalize:将每个单词的首字母变为大写

uppercase:将每个单词的所有字符变为大写

lowercase:将每个单词的所有字符变为小写

none:没有影响

text-indent

用于设置第一行内容的缩进

text-indent:2em 刚好缩进两个文字

text-align

用于设置元素内容在元素中的水平对齐方式

  1. left:左对齐
  2. right:右对齐
  3. center:正中间
  4. justify:两端对齐
1
2
3
4
5
6
7
8
9
/* justify */
.box4{
background-color: aqua;
width: 500px;
/* justify最后一行没有效果 */
text-align: justify;
/* justify最后一行有效果 */
text-align-last: justify;
}

五.文字属性(font)

font-size

决定文字大小

常用的设置

  1. 具体数值+单位

    比如:100px

    也可以使用em单位:1em代表100%,2em代表200%,0.5em代表50%

  2. 百分比

    基于父元素的font-size计算,比如50%表示等于父元素font-size的一半

  • 谷歌浏览器字体最小12px

font-family

用于设置文字的字体名称

可以设置一个或者多个字体名称(从左到右按顺序选择字体,直到找到可用的字体为止)

  • 一般情况下,英文字体只适用于英文,中文字体同时适用于中文和英文

    所以如果希望中英文使用不同字体,应该先将英文字体写在前面,中文字体写在后面

  • 字体中存在空格的时候加上单引号`

font-weight

用于设置文字的粗细(重量)

100|200|300|400|500|600|700|800|900:每个数字表示一个重量

normal:等于400

bold:等于700

font-style

用于设置字体的常规、斜体显示

normal:常规显示

italic:用字体的斜体显示(前提是font-family这种字体本身是支持斜体的)

oblique:文本倾斜显示(让文字倾斜)

  • em、i、cite、address、var、dfn等元素的font-style默认就是italic

font-varient

可以影响小写字母的显示形式

可以设置的值如下

  1. normal:常规显示

  2. small-caps:将小写字母替换为缩小过的大写字母

line-height

用于设置文本的最小行高

行高可以先简单理解为一行文字所占的高度

行高严格的定义是:两行文字基线(baseline)之间的间距

基线(baseline):与小写字母x最底部对齐的线

  • 注意区分height和line-height的区别

    • height:元素的整体高度
    • line-height:元素中每一行文字所占据的高度
  • height=line-height时可以居中(有文本时line-height也可以)

font

font是一个缩写属性

font-style font-varient font-weight font-size/line-height font-family

font-style、font-varient、font-weight可以随意调换顺序,也可以省略

  • /line-height可以省略,如果不省略,就必须跟在font-size后面

  • font-size、font-family不可以调换顺序,不可以省略

1
2
3
4
5
6
7
8
9
10
11
/* font-style font-varient font-weight font-size/line-height font-family */
font:bold italic small-caps 30px/50px "宋体";

/* style varient weight 可以省略 */
font: 30px/50px "宋体";

/* line-height也可以省略 */
font: 30px "宋体";

/* 错误的写法 */
font: "宋体" 30px;

六.更多选择器

属性选择器(attribute selectors)-[att]

[att]拥有title属性的元素

1
2
3
4
5
6
[title]{
color:red;
}
[title="div元素 one"]{
font-size: 25px;
}

[att*=val]title属性值包含单词one的元素

1
2
3
4
/* title中包含one单词 */
[title*="one"]{
background-color: blueviolet;
}

[att^=val]title属性值以one开头的元素

1
2
3
4
/* title以one开头 */
[title^="one"]{
text-decoration: underline;
}

[att$=val]title属性值以one结尾的元素

1
2
3
4
/* title以one结尾 */
[title$="one"]{
text-decoration: line-through;
}

[att|=val]title属性值恰好等于one或者以单词one开头且后面紧跟着连字符的元素

  • 一般是用在lang属性上面
1
2
3
4
5
6
7
[title|="one"]{
color:red;
}

[lang|="en"]{
color:red;
}

[att~=val]title属性值包含单词one的元素(单词one与其他单词之间必须用空格隔开

1
2
3
[title~="one"]{
color:red;
}

后代选择器(descendant combinator)

div元素里面的span元素(包括直接、间接子元素)

1
2
3
div span{
color:red;
}

子选择器 (child combinator)

div元素里面的直接span子元素(不包含间接子元素)

1
2
3
div>span{
color:red;
}

兄弟选择器 (adjacent sibling combinator)

div元素后面紧挨着的p元素(且div、p元素必须是兄弟关系)

1
2
3
div+p{
color:red;
}

全兄弟选择器 (general sibling combinator)

div元素后面的p元素(且div、必须是兄弟关系)

1
2
3
div~p{
color:red;
}

交集选择器

同时符合2个条件 的元素:div元素、class值的有one

1
2
3
div.one{
color:red;
}

所有同时符合3个条件的元素:div、class值有one、title属性值等于text

1
2
3
div.one[title="text"]{
color:red;
}

并集选择器

所有的div元素+所有class值有one的元素+所有title属性值等于text的元素

1
2
3
div,.one,[title]="text"{
color:red;
}

七. 伪类(pseudo-classes)

动态伪类 (dynamic pseudo-classes)

a:link未访问的链接

a:visited已访问的链接

a:hover鼠标挪到链接上

a:active激活的链接(鼠标在链接上长按住未松开)

  • 建议顺序:link、:visited 、:focus、:hover、:active(lvfha)

  • 使用注意

    • :hover必须放在:link和:visited后面才能生效
    • :active必须放在:hover后面才能完全生效
    1
    2
    3
    4
    5
    6
    7
    8
    9
    10
    11
    12
    13
    14
    15
    16
    17
    18
    19
    /* 未访问状态 */
    a:link {
    color: red;
    }

    /* 已经访问过 */
    a:visited {
    color: green;
    }

    /* 手指(鼠标)放上去 */
    a:hover {
    color: blue;
    }

    /* 手指点下去, 未松手 */
    a:active {
    color: orange;
    }
  • 除了a元素:hover、:active也能用在其他元素上

    1
    2
    3
    4
    5
    6
    7
    8
    /* 2.hover/active应用到其他元素 */
    strong:hover {
    background-color: purple;
    }

    strong:active {
    font-size: 40px;
    }

a:focus指当前拥有输入焦点的元素(能接收键盘输入)也适用于a元素

去除a元素的默认的:focus效果

1
2
3
4
5
6
7
8
/* 4.去掉a元素的焦点状态 */
a:focus {
outline: none;
}

<!-- tabindex可以调整tab选中元素的顺序 -->
<a tabindex="-1" href="#">Google一下</a>

直接给a元素设置样式,相当于给a元素的所有动态伪类都设置了

相当于a:link、a:visited、a:focus、a:hover、a:active的颜色都是red

1
2
3
a{
color:red
}

结构伪类(structural pseudo-classes)

:nth-child(1)是父元素中的第一个子元素

1
2
3
4
/* 1.第三个子元素 */
:nth-child(3) {
color: red;
}

p:nth-child(3)1.必须是p元素 2.p元素是子元素中第三个元素

1
2
3
4
/* 2.交集选择器: 1.必须是p元素 2.p元素是子元素中第三个元素 */
p:nth-child(3) {
color: red;
}

p span:nth-child(1)

区分有空格和没空格的区别

  • 没空格为交集选择器、有空格为后代选择器
1
2
3
4
5
6
7
8
9
10
11
12
13
14
15
16
17
/* 
交集选择器:
* 是一个p元素
* 同时作为子元素的第一个元素
*/
p:nth-child(1) {
color: red;
}

/*
后代选择器:
* 选择p元素, 但是后面是一个空格, 选p的后代
* 选择后代的第一个子元素
*/
p span:nth-child(1) {
color: green;
}

:nth-child(2n)是父元素中的第偶数个子元素

  • 和:nth-child(even)同义
1
2
3
4
5
6
7
8
9
10
11
12
13
14
15
16
17
p:nth-child(2n) {
color: red;
}

/* 1.n: 0, 1, 2, 3, 4, 5, 6, 7.... */
p:nth-child(n) {
color: red;
}

/* 2.2n: 2, 4, 6, 8: 偶数 */
/* 2n: 替换成 even */
p:nth-child(2n) {
color: red;
}
p:nth-child(even) {
color: red;
}

:nth-child(2n+1)是父元素中的第奇数个子元素

  • 和:nth-child(odd)同义
1
2
3
4
5
6
7
8
9
10
11
12
13
14
15
16
17
18
19
20
/* 2.2n+1: 1, 3, 5, 7: 奇数 */
p:nth-child(2n+1) {
color: blue;
}
/* 2n+1: 替换成odd */
p:nth-child(odd) {
color: blue;
}

/* 3.3n */
/* 3n: 3, 6, 9.... */
/* 3n+2: 2, 5, 8 */
p:nth-child(3n+2) {
color: green;
}

/* 4.负数: -n+3 可用于排行榜前3*/
p:nth-child(-n+3) {
color: red;
}

nth-last-child 从后向前数

1
2
3
4
5
6
7
8
9
10
11
12
13
14
/* nth-child: 正着数(从前向后) */
/* nth-last-child倒着数(从后向前) */

/* 1.跟数字 */
p:nth-last-child(3) {
color: red;
}

/* 2.跟n */
/* 0, 1, 2, 3 */
/* 1, 3, 5, 7 */
p:nth-last-child(2n+1) {
color: red;
}

:nth-of-type 相同类型,如果类型不同, 忽略

1
2
3
p:nth-of-type(2n) {
color: red;
}

:nth-last-of-type从后向前数

1
2
3
p:nth-last-of-type(3) {
color: red;
}

:first-child,等同于:nth-child(1)

:last-child,等同于:nth-last-child(1)

:first-of-type,等同于:nth-of-type(1)

:last-of-type,等同于:nth-last-of-type(1)

:only-child,是父元素中唯一的子元素

1
2
3
4
5
/* 父元素中的唯一子元素 */
/* 1.only-child */
body :only-child {
color: red;
}

only-of-type,唯一该类型的子元素

1
2
3
4
/* 2.only-of-type: 唯一该类型的子元素 */
body :only-of-type {
color: red;
}

:root,根元素,就是HTML元素

:empty,是父元素中唯一的这种类型的子元素

1
2
3
4
:empty {
height: 20px;
background-color: #f00;
}

否定伪类 (negation pseudo-class)

:not()的格式是:not(x)

元素选择器、通用选择器、属性选择器、类选择器、id选择器、伪类(除否定伪类)

1
2
3
:not(html) :not(body):not(div) {
color: red;
}

目标伪类(target pseudo-classes)

:target

语言伪类language pseudo-classes)

lang()

元素状态伪类 (UI element states pseudo-classes)

  1. :disabled

  2. :enable

  3. :checked

八. 伪元素(pseudo-elements)

建议: 使用两个冒号

为了区分伪元素和伪类,建议伪元素使用2个冒号,比如::first-line和::first-letter

:first-line

可以针对首行文本设置属性

只有下列属性可以应用在::first-line

  • 字体属性、颜色属性、背景属性
  • pword-spacing、letter-spacing、text-decoration、text-transform、line-height
1
2
3
p::first-line {
color: #fff;
}

:first-letter

可以针对首字母设置属性

只有下列属性可以应用在::first-letter

  • p字体属性、margin属性、padding属性、border属性、颜色属性、背景属性
  • ptext-decoration、text-transform、letter-spacing、word-spacing(适当的时候)、line-height、float、vertical-align(只有当float是none时)
1
2
3
p::first-letter {
font-size: 50px;
}

:before和:after

用来在一个元素的内容之前或之后插入其他内容(可以是文字、图片)

1
2
3
4
5
6
7
8
9
10
11
12
13
14
15
16
17
18
19
/* 结论: 伪元素可以看成是行内元素 */
span::before {
content: "1";

/* color: red; */
background-color: green;
display: inline-block;//修改特性
width: 100px;
height: 30px;
margin-right: 20px;
}

span::after {
/* content: "abc"; */
content: url("../img/test_01.webp");

color: purple;
margin-left: 20px;
}

九.CSS特性

继承

一个元素如果没有设置某属性的值,就会跟随父元素的值

一个元素如果有设置某属性的值,就使用自己设置的值

比如color、font-size等属性都是可以继承的

并不是所有的属性都可以继承(文本相关属性, 更多的去查文档MDN )

  • 不能继承的属性,一般可以使用inherit值强制继承

  • 注意事项:CSS属性继承的是计算值,并不是当初编写属性时的指定值(字面值)

    1
    2
    3
    4
    5
    6
    7
    8
    9
    10
    11
    12
    13
    14
    15
    16
    17
    18
    19
    20
    21
      <style>
    .box1 {
    font-size: 60px;
    }

    .box2 {
    font-size: 0.5em;//30px
    }

    p-> inherited from box2 {
    font-size: 0.5em; //30px
    }
    </style>

    <body>
    <div class="box1">
    <div class="box2">
    <p>哈哈哈</p>
    </div>
    </div>
    </body>

层叠

基本层叠: 选择器相同时, 后面的属性会层叠前面的属性

1
2
3
4
5
6
7
8
9
10
11
12
13
14
15
16
17
/* 
基本层叠: 后面一定把前面层叠掉
前提: 使用了相同的选择器
*/
.box1 {
color: red;
}

.box2 {
background-color: green;
color: purple;
}

.box3 {
width: 300px;
color: orange;
}

优先级(权重)

!important: 10000

内联样式: 1000

id: 100

类/伪类/属性: 10

元素/伪元素: 1

  • 优先比较优先级高的选择器
1
2
3
4
5
6
7
8
9
10
11
12
13
14
15
16
17
18
19
20
21
22
23
24
25
26
27
/* 2.给第二个div设置样式 */
/*
当选择器不同时, 就不能按照基本层叠来理解了
需要知道选择器的权重:
!important: 10000
内联样式: 1000
id: 100
class/属性/伪类: 10
元素/伪元素: 1
统配选择器: 0
*/
#main {
color: blue;
font-size: 30px;
}

.box {
color: green;
font-size: 12px !important;

background-color: purple;
}

div {
color: red;
font-size: 20px;
}

十.元素类型

块级元素和行内级元素

根据元素的显示(能不能在同一行显示)类型,HTML元素可以主要分为2大类

  1. 块级元素(block-level elements):独占父元素一行

    比如div、p、pre、h1~h6、ul、ol、li、dl、dt、dd、table、form、article、aside、footer、header、hgroup、main、nav、section、blockquote、hr等

  2. 行内级元素(inline-level elements):多个行内级元素可以在父元素的同一行中显示

    比如a、img、span、strong、code、iframe、label、input、button、canvas、embed、object、 video、audio等

1
2
3
4
5
6
7
8
9
10
11
12
13
14
15
16
17
18
<!-- 
块级元素的特点: 独占父元素的一行
行内级元素的特点: 和其他元素可以在同一行显示
-->

<!-- 1.块级元素 -->
<div class="box">
<div class="inner"></div>
<p class="p">我是段落</p>
</div>

<!-- 2.行内级元素 -->
<span>我是span元素</span>
<strong>我是strong元素</strong>

<img src="../img/test_01.webp" alt="">
<input type="text">
<iframe src="http://www.baidu.com" frameborder="0"></iframe>

替换元素和非替换元素

根据元素的内容(是否浏览器会替换掉元素)类型,HTML元素可以主要分为2大类

  1. 替换元素(replaced elements):元素本身没有实际内容,浏览器根据元素的类型和属性,来决定元素的具体显示内容

    比如img、input、iframe、video、embed、canvas、audio、object等

  2. 非替换元素(non-replaced elements)

    和替换元素相反,元素本身是有实际内容的,浏览器会直接将其内容显示出来,而不需要根据元素类型和属性来判断到底显示什么内容

    比如div、p、pre、h1~h6、ul、ol、li、dl、dt、dd、table、form、article、aside、footer、header、hgroup、main、nav、section、blockquote、hr、a、strong、span、code、label等
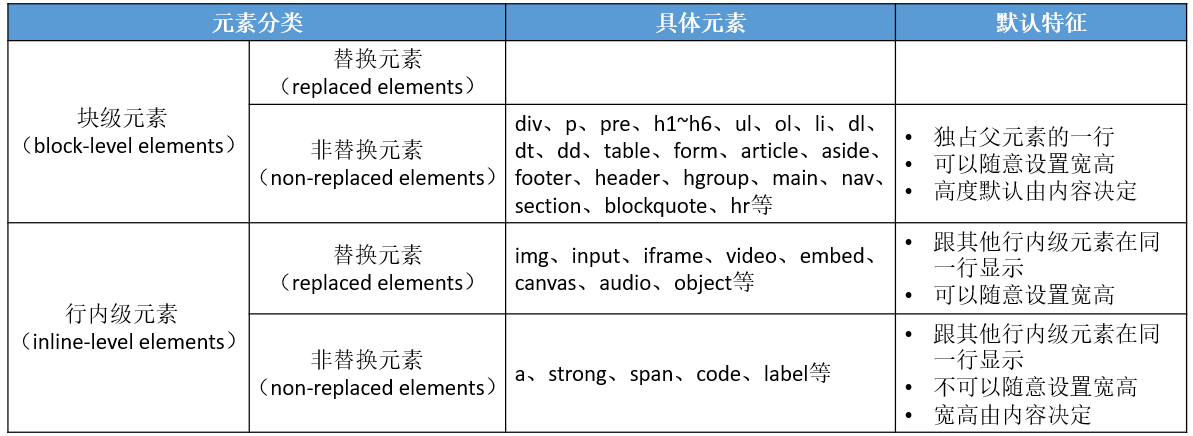
image-20200324202229217

display属性

能修改元素的显示类型,有4个常用值

  1. block:让元素显示为块级元素
  2. inline:让元素显示为行内级元素
  3. none::隐藏元素
  4. inline-block:让元素同时具备行内级、块级元素的特征
  • 可以让元素同时具备块级、行内级元素的特征
    跟其他行内级元素在同一行显示
    可以随意设置宽高
    宽高默认由内容决定

  • 可以理解为
    对外来说,它是一个行内级元素
    对内来说,它是一个块级元素

  • 常见用途
    让行内级非替换元素(比如a、span等)能够随时设置宽高
    让块级元素(比如div、p等)能够跟其他元素在同一行显示

1
2
3
4
5
6
7
8
9
10
11
12
13
14
15
16
17
18
19
20
21
22
23
24
25
/* 
display:
1.block (浏览器默认给div/p/h1..元素设置了display: block)
2.inline (将block元素转回到行内元素)
3.none (隐藏元素, 不占据空间)
4.inline-block
* 可以和其他元素在同一行显示
* 可以设置宽度和高度
*/

span {
display: block;
}

div, p, h1 {
/* display: inline; */
display: inline-block;
background-color: #f00;
width: 200px;
height: 100px;
}

div {
display: none;
}

邮箱练习

分页练习

display的以下取值,等同于某些HTML元素

  • table:<table>,一个block-level表格
  • inline-table:<table>,一个inline-level表格
  • table-row:<tr>

  • table-row-group:<tbody>

  • table-header-group:<thead>

  • table-footer-group:<tfoot>

  • table-cell:<td>、<th>,一个单元格

  • table-caption:<caption>,表格的标题

  • list-item:<li>

元素之间的空格

  • 行内级元素(包括inline-block元素)的代码之间如果有空格,会被解析显示为空格

  • 目前建议的解决方法

  1. 元素代码之间不要留空格
  2. 注释掉空格
  3. 设置父元素的font-size为0,然后在元素中重新设置自己需要的font-size(此方法在Safari不适用)
  4. (推荐)给元素加float

调色网站 https://flatuicolors.com/

块级元素、inline-block元素

一般情况下,可以包含其他任何元素(比如块级元素、行内级元素、inline-block元素)

  • 特殊情况,p元素不能包含其他块级元素

行内元素(比如a、span、strong等)

  • 一般情况下,只能包含行内元素
1
2
3
4
5
6
7
8
9
10
11
12
13
<!-- 
1.总结: (一般情况下)
* 块级元素和行内块级元素(inline-block), 可以嵌套任意的元素
* 行内元素(span/strong/a)里面不要嵌套块级元素

-->

<div>
<p><span></span></p>
<strong></strong>
<a href=""></a>
</div>

visibility属性

能控制元素的可见性,有2个常用值

  1. visible:显示元素
  2. hidden:隐藏元素

visibility: hidden和 display: none 的区别

  • visibility: hidden;虽然元素看不见了,但元素的框依旧还留着,还会占着原来的位置
  • display: none;不仅元素看不见了,而且元素的框也会被移除,不会占着任何位置
1
2
3
4
5
6
7
8
9
10
11
12
div {
width: 100px;
height: 100px;
background-color: #f00;

/* 隐藏div */
/* 1.display: none div元素不再占据空间 */
display: none;

/* 2.visibility: hidden 隐藏元素, 依然占据空间 */
visibility: hidden;
}

overflow属性

用于控制内容溢出时的行为

visible:溢出的内容照样可见

hidden:溢出的内容直接裁剪

scroll:溢出的内容被裁剪,但可以通过滚动机制查看,会一直显示滚动条区域,滚动条区域占用的空间属于width、height

auto:自动根据内容是否溢出来决定是否提供滚动机制还有overflow-x、overflow-y两个属性,可以分别设置水平垂直方向
(建议还是直接使用overflow,因为目前overflow-x、overflow-y还没有成为标准,浏览器可能不支持)

1
2
3
4
5
6
7
8
9
10
11
12
13
14
15
16
17
18
19
20
21
22
    .box {
background-color: #f00;
width: 300px;
height: 300px;

/* overflow */
/* visible: 超出依然可见, 默认值 */
overflow: visible;

/* hidden: 超出部分, 隐藏起来 */
overflow: hidden;

/* scroll: 超出部分会隐藏, 但是可以通过滚动查看 */
overflow: scroll;

/* auto: 有超出部分, 可以滚动, 没有就正常显示 */
overflow: auto;

overflow-x: auto;
overflow-y: hidden;
}
</style>

word-break属性

十一.盒子模型(Box Model)

HTML中的每一个元素都可以看做是一个盒子

1
2
3
4
5
6
7
8
9
.box {
width: 100px;
height: 100px;
background-color: #0f0;

padding: 20px;
border: 10px solid red;
margin: 30px;
}

内容(content)]

盒子里面装的东西

width:宽度

min-width:最小宽度,无论内容多少,宽度都大于或等于min-width

max-width:最大宽度,无论内容多少,宽度都小于或等于max-width

height:高度

min-height:最小高度,无论内容多少,高度都大于或等于min-height

max-height:最大高度,无论内容多少,高度都小于或等于max-height

1
2
3
4
5
6
7
8
9
10
11
12
13
14
15
16
17
/* 1.设置宽度相关 */
/* 1.1.设置宽度 */
width: 200px;
/* 1.2.最小宽度 */
min-width: 800px;
/* 1.3.最大宽度 */
max-width: 300px;

/* display: inline-block; */

/* 2.设置高度相关 */
/* 2.1.设置高度 */
height: 100px;
/* 2.2.最小高度: 大于等于 */
min-height: 600px;
/* 2.3.最大高度: 小于等于 */
max-height: 200px;

内边距(padding)

盒子边缘和里面装的东西之间的间距(上右下左)

padding-top:上内边距

padding-right:右内边距

padding-bottom:下内边距

padding-left:左内边距

padding:是padding-top、padding-right、padding-bottom、padding-left的简写属性

1
2
3
4
5
6
7
8
9
10
11
12
13
14
15
16
17
18
19
20
21
22
23
.box {
display: inline-block;
width: 500px;
background-color: skyblue;

/* 内边距 */
/* padding-top: 20px;
padding-right: 30px;
padding-bottom: 40px;
padding-left: 50px; */

/* 上右下左 */
padding: 10px 20px 30px 40px;

/* 三个值: 上右下, 没有左, 左边跟随右边的值 */
/* padding: 10px 20px 30px; */

/* 两个值: 上和右, 没有下,跟随上,没有左,根据右 */
/* padding: 10px 20px; */

/* 一个值: 上下左右都使用同一个值 */
padding: 10px;
}

外边距(margin)

盒子和其他盒子之间的间距

margin-top:上外边距

margin-right:右外边距

margin-bottom:下外边距

margin-left:左外边距

margin:是margin-top、margin-right、margin-bottom、margin-left的简写属性

1
2
3
4
5
6
7
8
9
10
11
12
13
14
15
16
17
18
19
20
21
22
23
24
25
26
27
28
29
30
31
32
33
/* 1.margin的上下    */
/* .box1 {
margin-bottom: 20px;
}

.box2 {
margin-top: 20px;
} */

/* 2.margin的左右 */
.box1 {
margin-right: 20px;
}

.box2 {
margin-left: 20px;
}

/* 3.margin的值 */
.box {
/* 四个值: 上右下左 */
margin: 1 2 3 4;

/* 三个值: 上右下(左跟右) */
margin: 10px 20px 30px;

/* 两个值: 上右(下跟上)(左跟右) */
margin: 0 20px;

/* 一个值: 上下左右统一 */
margin: 10px;
}

margin的传递(左右不会传递)

margin-top传递

如果块级元素的顶部线和父元素的顶部线重叠

那么这个块级元素的margin-top值会传递给父元素

1
2
3
4
5
6
7
8
9
10
11
12
13
14
15
16
17
18
19
20
21
22
/* 演示传递 */
.box {
width: 200px;
height: 200px;
background-color: orange;

/* padding-top: 5px; */
/* border-top: 1px solid yellowgreen; */
overflow: hidden;
}

.inner {
width: 100px;
height: 100px;
background-color: purple;

/* 左右是不会传递 */
/* margin-left: 20px; */

/* 上下margin会进行传递 */
margin-top: 20px;
}

margin-bottom传递

如果块级元素的底部线和父元素的底部线重叠,并且父元素的高度是auto

那么这个块级元素的margin-bottom值会传递给父元素

1
2
3
4
5
6
7
8
9
10
11
12
13
/* 演示传递 */
.box {
width: 200px;
background-color: orange;
}

.inner {
width: 100px;
height: 100px;
background-color: purple;

margin-bottom: 20px;
}
  • 如何防止出现传递问题?
    1. 给父元素设置padding-top\padding-bottom
    2. 给父元素设置border
    3. 触发BFC( block format context): 设置overflow为auto/hidden
  • 建议
    1. margin一般是用来设置兄弟元素之间的间距
    2. padding一般是用来设置父子元素之间的间距

margin的折叠 (左右不会折叠)

垂直方向上相邻的2个margin(margin-top、margin-bottom)有可能会合并为1个margin

这种现象叫做collapse(折叠)

  • 折叠后最终值的计算规则:两个值进行比较,取较大的值
  • 如何防止margin collapse?只设置其中一个元素的margin
1
2
3
4
5
6
7
8
9
10
11
12
13
div {
width: 100px;
height: 100px;
background-color: #f00;
}

.box1 {
margin-bottom: 40px;
}

.box2 {
margin-top: 20px;
}

边框(border)

就是盒子的边框,边缘部分

边框宽度border-width

是下面4个属性的简写属性

  1. border-top-width

  2. border-right-width

  3. border-bottom-width

  4. border-left-width

边框颜色border-color

是下面4个属性的简写属性

  1. border-top-color
  2. border-right-color
  3. border-bottom-color
  4. border-left-color

边框样式border-style

是下面4个属性的简写属性

  1. border-top-style
  2. border-right-style
  3. border-bottom-style
  4. border-left-style
  • 边框颜色、宽度、样式的编写顺序任意
1
2
3
4
5
6
7
8
9
10
11
12
13
14
15
16
17
.box {
width: 100px;
height: 100px;
background-color: #f00;

/* 需求: 增加一个有边框 */
border-right-width: 10px;
border-right-color: yellowgreen;
border-right-style: solid;

border-width: 10px;
border-color: skyblue;
border-style: solid;

/* 宽度 样式 颜色 */
border: yellow 10px solid;
}

边框样式取值

none:没有边框,边框颜色、边框宽度会被忽略

dotted:边框是一系列的点

dashed:边框是一条虚线

solid:边框是一条实线

double:边框有两条实线。两条线宽和其中的空白的宽度之和等于border-width的值

groove:边框看上去好象是雕刻在画布之内

ridge:和grove相反,边框看上去好象是从画布中凸出来

inset:该边框使整个框看上去好象是嵌在画布中

outset:和inset相反,该边框使整个框看上去好象是从画布中凸出来

1
2
3
4
5
6
7
.box {
width: 100px;
height: 100px;
background-color: #f00;

border: 1px dashed purple;
}

边框的形状

比如矩形、梯形、三角形等形状

1
2
3
4
5
6
7
8
9
10
11
12
13
14
15
16
17
18
19
20
21
22
23
24
25
26
27
28
29
30
31
32
33
34
35
36
37
38
39
40
41
42
43
44
45
46
47
48
49
50
51
52
53
body {
background-color: #f5f5f5;
}

div {
margin-bottom: 20px;
}

.box1 {
width: 100px;
height: 100px;
background-color: #f00;

border-top: 20px solid yellowgreen;
border-left: 20px solid purple;
}

.box2, .box3, .box4, .box5 {
width: 0;
height: 0;
}

.box2 {
border-top: 100px solid yellowgreen;
border-left: 100px solid purple;
}

.box3 {
border-width: 50px;
border-style: solid;

border-top-color: purple;
border-right-color: orange;
border-bottom-color: orchid;
border-left-color: powderblue;
}

.box4 {
border-width: 50px;
border-style: solid;

border-top-color: purple;
border-right-color: transparent;
border-bottom-color: transparent;
border-left-color: transparent;
}

.box5 {
border-top: 100px solid green;
border-left: 100px solid transparent;

transform: rotate(-45deg);
}

行内级元素margin设置

以下属性对行内非替换元素不起作用
width、height、margin-top、margin-bottom

1
2
3
4
5
6
7
span {
background-color: #f00;
/* margin-left: 20px;
margin-right: 30px; */

margin-top: 100px;
}

以下属性对行内非替换元素的效果比较特殊
padding-top、padding-bottom、上下方向的border

1
2
3
4
5
6
7
8
9
10
11
12
13
14
15
16
17
18
19
span {
background-color: #f00;

display: inline-block;

/* 1.padding */
/* padding的左右 */
/* padding: 0 20px; */

/* padding的上下: 上下会多出区域, 但是这个区域不占据空间 */
/* padding-bottom: 10px; */

/* 2.border */
/* border的左右 */
border-right: 10px solid yellowgreen;

/* border的上下 */
border-bottom: 10px solid purple;
}

CSS属性-border-*-*-radius

两个值分别是水平半径和垂直半径(如果不设置,就跟随水平半径的值)
还可以设置百分比,参考的是border-box的宽度

​ 四个值依次是(顺时针方向)

  1. border-top-left-radius
  2. border-top-right-radius
  3. border-bottom-left-radius
  4. border-bottom-right-radius
  • border-radius大于或等于50%时,就会变成一个圆
1
2
3
4
5
6
7
8
9
10
11
12
13
14
15
16
17
.box1 {
/* 针对每一个角落单独设置 */
/* border-top-left-radius: 10px 50px; */
/* border-top-left-radius: 50px;
border-top-right-radius: 50px;
border-bottom-left-radius: 50px;
border-bottom-right-radius: 50px; */

border-radius: 50px;
}

.box2 {
/* border-radius: 120px; */
/* 强调:border-radius参考是当前元素的border+padding+width */
/* 240*0.5 = 120 */
border-radius: 50%;
}

CSS属性-outline

  • 可以调试网站
1
2
3
div{
outline:2px solid red !important;
}

元素的外轮廓,不占用空间,默认显示在border的外面

  1. outline-width
  2. outline-style:取值跟border的样式一样,比如solid、dotted等
  3. outline-color
  4. outline:outline-width、outline-style、outline-color的简写属性,跟border用法类似
  • 去除a元素、input元素的focus轮廓效果
1
2
3
4
5
6
7
8
9
10
11
12
13
14
15
16
17
.box {
width: 100px;
height: 100px;
background-color: #f00;

/* border: 5px solid yellowgreen; */
outline: 5px solid yellowgreen;
}

span {
background-color: orange;
}

/* CSS Reset */
a, input, textarea {
outline: none;
}

CSS属性-box-shadow

可以设置一个或者多个阴影,每个阴影用<shadow>表示

多个阴影之间用逗号,隔开,从前到后叠加
<shadow>的常见格式如下:

<shadow>=inset?&&<length>{2,4}&&<color>?

第1个<length>:水平方向的偏移,正数往右偏移

第2个<length>:垂直方向的偏移,正数往下偏移

第3个<length>:模糊半径(blur radius)

第4个<length>:延伸距离

<color>:阴影的颜色,如果没有设置,就跟随color属性的颜色

inset:外框阴影变成内框阴影

1
2
3
4
5
6
7
8
.box {
width: 100px;
height: 100px;
margin: 0 auto;
background-color: #f00;

box-shadow: orange -15px 5px 10px 5px inset;
}

阴影练习

  1. 可以设置多个阴影

  2. 模糊会向四周扩散

1
2
3
4
5
6
7
8
9
10
11
12
13
14
.box {
width: 200px;
height: 300px;
background-color: #fff;
border: 1px solid orange;
margin: 30px auto;

/* 方法一: */
/* box-shadow: -10px 10px 5px,
10px 10px 10px; */

/* 方法二: */
box-shadow: 0 10px 10px 10px rgba(0, 0, 0, .2);
}

CSS属性-text-shadow

text-shadow用法类似于box-shadow,用于给文字添加阴影效果

text-shadow同样适用于::first-line、::first-letter

<shadow>=<length>{2,3}&&<color>

1
2
3
4
5
6
7
8
9
10
11
12
13
14
15
16
17
18
19
20
.box {
font-size: 25px;
font-weight: 700;

text-shadow: 5px 5px 5px red,
-5px 5px 5px green;
}

p {
width: 500px;
}

p::first-line {
text-shadow: 2px 2px 2px orange;
}

p::first-letter {
font-size: 25px;
text-shadow: 2px 2px 2px purple;
}

CSS属性 -box-sizing

用来设置盒子模型中宽高的行为

  1. content-box
    padding、border都布置在width、height外边

    元素的实际占用宽度 = border + padding + width
    元素的实际占用高度 = border + padding + height

  2. border-box
    padding、border都布置在width、height里边

    元素的实际占用宽度 = width
    元素的实际占用高度 = height

1
2
3
4
5
6
7
8
9
10
11
12
13
14
.box {
width: 200px;
height: 200px;
background-color: #f00;

padding-bottom: 20px;
border-bottom: 20px solid purple;

/* 内容盒子 */
/* content-box: 含义是设置宽度和高度时只是指定内容的宽高 */
/* border-box: 含义是设置宽度和高度时是内容+内边距+边框的宽度 */
/* 盒子的内减 */
box-sizing: border-box;
}

不同类型方式的水平居中

  1. 行内级元素、inline-block元素
    水平居中:在父元素中设置text-align: center

  2. 块级元素
    水平居中:margin: 0 auto

1
2
3
4
5
6
7
8
9
10
11
12
13
14
15
16
17
18
19
20
21
22
23
24
25
26
27
28
29
30
31
32
33
34
35
36
37
38
39
40
41
42
43
44
.box {
height: 200px;
background-color: #f00;

width: 600px;

/* 1.普通的文本 */
/* text-align: center; */

/* 2.行内元素 */
/* text-align: center; */

/* 3.图片: 行内替换元素 */
/* text-align: center; */

/* 4.inline-block的居中 */
/* text-align: center; */
text-align: center;
}

strong {
background-color: purple;
}

.ib {
display: inline-block;
width: 100px;
height: 100px;
background-color: orange;
}

.block {
background-color: yellowgreen;
width: 200px;
height: 100px;

/* margin: 0 auto; */
margin-left: auto;
margin-right: auto;
}

span {
text-shadow: 5px 5px;
}

margin水平居中原理

1
2
3
4
5
6
7
8
9
10
11
12
13
14
15
16
17
18
19
.box {
height: auto;
width: 500px;
background-color: #f00;
}

.inner {
width: 150px;
height: 100px;
background-color: #ff0;

/* 可以实现: 水平方向的 父元素的宽度是auto */
margin-left: auto;
margin-right: auto;

/* 实现不了居中: 垂直意味着 父元素高度必须auto */
margin-top: auto;
margin-bottom: auto;
}

十二. 背景图片(background)

background-image

用于设置元素的背景图片,会盖在(不是覆盖)background-color的上面

设置的第一张图片将显示在最上面,其他图片按顺序层叠在下面

  • 注意:如果设置了背景图片后,元素没有具体的宽高,背景图片是不会显示出来的
1
2
3
4
5
6
7
8
9
10
11
12
13
14
.box {
width: 800px;
height: 600px;
background-color: #f00;

/* 默认显示的是第一张 */
background-image: url("../img/juren_01.jpg"), url("../img/juren_02.jpg");

/* 平铺效果 */
/* repeat-x */
/* repeat-y */
/* no-repeat */
background-repeat: no-repeat;
}

background-repeat

用于设置背景图片是否要平铺

  1. repeat:平铺

  2. no-repeat:不平铺

  3. repeat-x:只在水平方向平铺

  4. repeat-y:只在垂直平方向平铺

1
2
3
4
5
6
7
.box {
width: 800px;
height: 500px;

background-image: url("../img/wall.png");
background-repeat: repeat;
}

background-size

用于设置背景图片的大小

  1. auto:以背景图本身大小显示
  2. cover:缩放背景图,以完全覆盖铺满元素
  3. contain:缩放背景图,宽度或者高度铺满元素,但是图片保持宽高比
  4. <percentage>:百分比,相对于背景区(background positioning area)
  5. length:具体的大小,比如100px
1
2
3
4
5
6
7
8
9
10
11
12
13
14
15
16
17
18
19
.box {
width: 1200px;
height: 500px;

background-color: #f00;

background-image: url("../img/juren_01.jpg");
background-repeat: no-repeat;

/* background-size: */
/* 1.cover: 对背景图片进行拉伸, 让背景图片覆盖整个元素 */
/* background-size: cover; */

/* 2.contain: 对背景图片进行拉伸, 拉伸到一个方向的宽度(高度), 不再进行拉伸, 保持图片的宽高比 */

/* 3.设置值: 百分比或者具体的大小 */
/* background-size: 33% 80%; */
background-size: 300px 300px;
}

background-position

用于设置背景图片在水平、垂直方向上的具体位置

  1. 水平方向还可以设值:left、center、right

  2. 垂直方向还可以设值:top、center、bottom

如果只设置了1个方向,另一个方向默认是center
比如background-position: 80px; 等价于 background-position: 80px center;

1
2
3
4
5
6
7
8
9
10
11
12
13
14
15
.box {
margin-left: 100px;
width: 800px;
height: 500px;

background-color: #f00;

background-image: url("../img/juren_01.jpg");
background-repeat: no-repeat;


/* background-position */
/* background-position: -100px -100px; */
background-position: right;
}

CSS Sprite

使用CSS Sprite的好处

  1. 减少网页的http请求数量,加快网页响应速度,减轻服务器压力
  2. 减小图片总大小
  3. 解决了图片命名的困扰,只需要针对一张集合的图片命名

Sprite图片制作(雪碧图、精灵图)
方法1:Photoshop
方法2:https://www.toptal.com/developers/css/sprite-generator

京东练习

背景居中-梦幻西游

background-attachment

可以设置以下3个值

  1. scroll:背景图片跟随元素一起滚动(默认值)
  2. local:背景图片跟随元素以及元素内容一起滚动
  3. fixed:背景图片相对于浏览器窗口固定
1
2
3
4
5
6
7
8
9
10
11
12
    width: 200px;
height: 500px;
background-image: url("../img/juren_01.jpg");
/* scroll: 随着box的滚动(浏览器), 背景一起滚动 */

/* local:会随着box内容的滚动, 背景一起滚动 */
/* background-attachment: local; */

/* fixed: 背景是固定的, 不会随着box的滚动而滚动 */
/* background-attachment: fixed; */
overflow: auto;
}

background

简写属性,常用格式是
image position/size repeat attachment color

  • background-size可以省略

  • 如果不省略,/background-size必须紧跟在background-position的后面
    其他属性也都可以省略,而且顺序任意

1
2
3
4
5
6
7
8
9
10
11
12
13
14
15
.box {
background-color: #fff;
background-image: url();
background-repeat: no-repeat;
background-size: contain;
background-position: 0 0;
background-attachment: fixed;

/* background: ;
font: font-size/line-height font-family; */

/* background: red; */
/* background: url("../img/juren_01.jpg"); */
background: no-repeat red url("../img/juren_01.jpg");
}

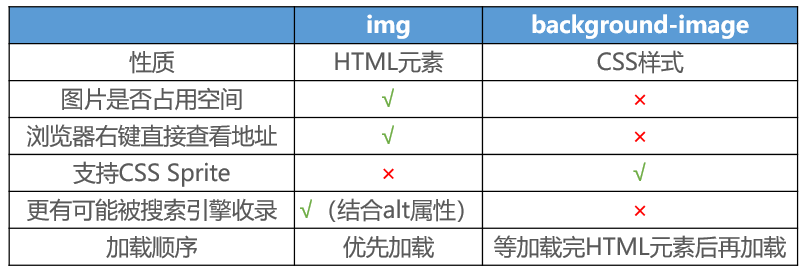
background-image和img的选择

image-20200325203246770

  1. img,作为网页内容的重要组成部分,比如广告图片、LOGO图片、文章配图、产品图片
  2. background-image,可有可无。有,能让网页更加美观。无,也不影响用户获取完整的网页内容信息

CSS属性-cursor

设置鼠标指针(光标)在元素上面时的显示样式

cursor常见的设值有

  1. auto:浏览器根据上下文决定指针的显示样式,比如根据文本和非文本切换指针样式
  2. default:由操作系统决定,一般就是一个小箭头image-20200325204135647
  3. pointer:一只小手,鼠标指针挪动到链接上面默认就是这个样式image-20200325204147366
  4. text:一条竖线,鼠标指针挪动到文本输入框上面默认就是这个样式image-20200325204154863
  5. none:没有任何指针显示在元素上面
1
2
3
4
5
6
7
8
9
10
11
12
13
14
15
16
17
.box {
width: 100px;
height: 100px;
background-color: #f00;

/* default: 小箭头 */
/* cursor: default; */
/* pointer: 小手儿 */
/* cursor: pointer; */
/* text: 竖线 */
/* cursor: text; */
cursor: none;
}

a {
cursor: text;
}

十三.定位(position)

标准流 (normal flow)

默认情况下,元素都是按照normal flow(标准流、常规流、正常流、文档流【document flow】)进行排布

从左到右、从上到下按顺序摆放好

默认情况下,互相之间不存在层叠现象

margin、padding定位

在标准流中,可以使用margin、padding对元素进行定位

其中margin还可以设置负数

比较明显的缺点是

设置一个元素的margin或者padding,通常会影响到标准流中其他元素的定位效果

不便于实现元素层叠的效果

CSS属性-position

可以对元素进行定位,常用取值有4个

static静态定位

position属性的默认值

元素按照normal flow布局

left 、right、top、bottom没有任何作用

relative相对定位

元素按照normal flow布局

可以通过left、right、top、bottom进行定位

  • 定位参照对象是元素自己原来的位置

left、right、top、bottom用来设置元素的具体位置,对元素的作用如下图所示
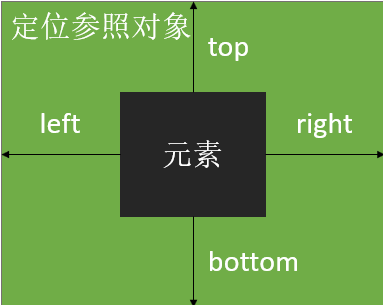
image-20200326092920133

相对定位的应用场景
在不影响其他元素位置的前提下,对当前元素位置进行微调

相对定位练习1
1
2
3
4
5
6
7
8
9
10
11
12
13
sub, sup {
font-size: 14px;
}

sub {
position: relative;
bottom: 5px;
}

sup {
position: relative;
top: 2px;
}
相对定位练习2
1
2
3
4
5
6
7
8
9
10
11
12
13
14
15
16
17
18
19
body {
margin: 0;
}

.box {
overflow: hidden;
min-width: 1000px;
}

.box img {
/* 1.向左移动img的一半 */
position: relative;
left: -960px;
/* left: -50%; */
/* transform: translate(-50%); */

/* 2.向右移动父元素(.box)的一半 */
margin-left: 50%;
}

fixed固定定位

元素脱离normal flow(脱离标准流、脱标)

可以通过left、right、top、bottom进行定位

  • 定位参照对象是视口(viewport)

当画布滚动时,固定不动

1
2
3
4
5
6
7
8
9
10
11
12
13
14
15
16
17
div {
background-color: #f00;
}

a {
position: fixed;
/* top: 20px; */
bottom: 20px;
right: 20px;
}

strong {
position: fixed;

left: 50px;
bottom: 50px;
}

脱离标准流元素的特点

  1. 可以随意设置宽高
  2. 宽高默认由内容决定
  3. 不再受标准流的约束
  4. 不再给父元素汇报宽高数据
1
2
3
4
5
6
7
8
9
10
11
12
13
14
15
16
17
18
19
20
21
22
23
24
25
26
div {
background-color: #f00;
}

a {
position: fixed;
/* top: 20px; */
bottom: 20px;
right: 20px;
}

strong {
position: fixed;
background-color: purple;
width: 100px;
height: 50px;

left: 50px;
bottom: 50px;
}

div {
position: fixed;
top: 20px;
right: 20px;
}

absolute绝对定位

元素脱离normal flow(脱离标准流、脱标)

可以通过left、right、top、bottom进行定位

  • 定位参照对象是最邻近的定位祖先元素
  • 如果找不到这样的祖先元素,参照对象是视口

定位元素(positioned element)

  • position值不为static的元素,也就是position值为relative、absolute、fixed的元素
1
2
3
4
5
6
7
8
9
10
11
12
13
14
15
16
17
18
19
20
21
22
23
.box1 {
position: relative;

width: 500px;
height: 500px;
background-color: #f00;
}

.box2 {
position: absolute;

right: 0;

width: 300px;
height: 300px;
background-color: #0f0;
}

a {
position: absolute;
top: 20px;
right: 20px;
}
绝对定位练习一 手机考拉
1
2
3
4
5
6
7
8
9
10
11
12
13
14
15
16
17
18
19
20
21
22
23
24
25
26
27
28
29
30
31
32
33
34
35
36
37
38
39
40
41
42
43
44
.beauty-left {
position: relative;
background-color: #f00;
display: inline-block;
}

.beauty-left ul {
position: absolute;
bottom: 30px;
width: 285px;

text-align: justify;
text-align-last: justify;

/* 居中显示 */
left: 0;
right: 0;
margin: 0 auto;
}

.beauty-left ul li {
display: inline-block;
}

.beauty-left ul li a {
display: inline-block;
width: 80px;
height: 40px;
line-height: 40px;
margin-top: 10px;
font-size: 12px;

text-align: center;
text-align-last: center;

border: 1px solid #eaeaea;
border-radius: 40px;
box-shadow: 0 0 0 1px rgba(0,0,0,.1);
background-color: #fff;
}

.beauty-left ul li a:hover {
color: #ff1e32;
}
绝对定位练习二 下拉二维码
1
2
3
4
5
6
7
8
9
10
11
12
13
14
15
16
17
18
19
20
21
22
23
24
25
26
27
28
29
30
31
32
33
34
35
36
37
38
39
40
41
42
43
44
45
46
47
48
49
50
51
52
53
54
55
56
.phone {
position: relative;

/* 为了能看到下拉出来的内容 */
margin-left: 300px;
}

.phone>span {
font-size: 12px;
}

.phone .code {
display: none;
position: absolute;
top: 27px;
left: 0;
/* left: -64px; */
transform: translate(-50%);
margin-left: 50%;

padding: 5px 5px 0;
border: 1px solid #eaeaea;
}

.phone .code img {
margin-bottom: 3px;
}

.phone .code span {
display: block;
text-align: center;
font-size: 14px;
}

.arrow {
position: absolute;
top: -5px;
/* left: 58px; */
left: 0;
right: 0;
margin: 0 auto;

width: 8px;
height: 8px;
background-color: #fff;

border-top: 1px solid #eaeaea;
border-left: 1px solid #eaeaea;

transform: rotate(45deg);
}

/* 显示和效果 */
.phone span:hover+.code {
display: inline;
}

子绝父相

在绝大数情况下,子元素的绝对定位都是相对于父元素进行定位

如果希望子元素相对于父元素进行定位,又不希望父元素脱标,常用解决方案是:

父元素设置position: relative(让父元素成为定位元素,而且父元素不脱离标准流)

子元素设置position: absolute

绝对定位技巧

绝对定位元素(absolutely positioned element)

position值为absolute或者fixed的元素

对于绝对定位元素来说
定位参照对象的宽度 = left + right + margin-left + margin-right + 绝对定位元素的实际占用宽度
定位参照对象的高度 = top + bottom + margin-top + margin-bottom + 绝对定位元素的实际占用高度

  • 如果希望绝对定位元素的宽高和定位参照对象一样,可以给绝对定位元素设置以下属性
    left: 0、right: 0、top: 0、bottom: 0、margin:0

  • 如果希望绝对定位元素在定位参照对象中居中显示,可以给绝对定位元素设置以下属性
    left: 0、right: 0、top: 0、bottom: 0、margin: auto
    另外,还得设置具体的宽高值(宽高小于定位参照对象的宽高)

1
2
3
4
5
6
7
8
9
10
11
12
13
14
15
16
17
18
19
20
21
22
23
24
25
26
27
28
.box {
position: relative;
width: 600px;
height: 600px;
background-color: #f00;
}

.inner {
position: absolute;
/* 1.让完全占据父元素 */
/* left: 0;
right: 0;
top: 0;
bottom: 0; */

/* 2.让内容居中 */
width: 200px;
height: 200px;

left: 0px;
right: 0px;
top: 0;
bottom: 0;
margin: auto;

/* height: 100px; */
background-color: yellowgreen;
}

position总结

image-20200327102647799

元素的层叠

标准元素: 标准流中的元素是不存在层叠

定位元素: 定位元素会层叠到标准流元素的上面

  1. 定位元素之间可以z-index

  2. 前提: 必须是定位元素 - 非static

image-20200327103004347

CSS属性-z-index

用来设置定位元素的层叠顺序(仅对定位元素-非static)

取值可以是正整数、负整数、0

比较原则

  • 如果是兄弟关系

    z-index越大,层叠在越上面

    z-index相等,写在后面的那个元素层叠在上面

  • 如果不是兄弟关系

    各自从元素自己以及祖先元素中,找出最邻近的2个定位元素进行比较

    而且这2个定位元素必须有设置z-index的具体数值

1
2
3
4
5
6
7
8
9
10
11
12
13
14
15
16
17
18
19
20
21
22
23
24
25
26
27
28
29
30
31
32
33
.box1 {
width: 300px;
height: 300px;
background-color: #f00;
}

.inner {
width: 100px;
height: 100px;
background-color: yellowgreen;
}

.box2 {
display: inline-block;
width: 200px;
height: 200px;
background-color: purple;
}

span {
position: relative;
background-color: orange;
left: -100px;

z-index: 9;
}

strong {
position: relative;
background-color: green;

z-index: 9;
}

十四.浮动(float)

定位方案(Position Schemes)

在CSS中,有3种常用的方法对元素进行定位、布局

  1. normal flow:标准流、常规流、文档流
  2. absolute positioning:绝对定位
  3. float:浮动

绝对定位、浮动都会让元素脱离标准流,以达到灵活布局的效果

CSS属性-float

让元素产生浮动效果,float的常用取值

  1. none:不浮动,默认值
  2. left:向左浮动
  3. right:向右浮动

浮动的规则一

元素一旦浮动后

脱离标准流

朝着向左或向右方向移动,直到自己的边界紧贴着包含块(一般是父元素)或者其他浮动元素的边界为止

定位元素会层叠在浮动元素上面

1
2
3
4
5
6
7
8
9
10
11
12
13
14
15
16
17
18
19
20
21
22
23
24
.box {
height: 200px;
background-color: #f00;
}

.inner {
display: inline-block;
width: 100px;
height: 100px;
background-color: orange;
}

strong {
float: left;

background-color: #0f0;
}

a {
/* float: left; */

background-color: #00f;
color: #fff;
}

浮动的规则二

浮动元素不能与行内级内容层叠,行内级内容将会被浮动元素推出

比如行内级元素、inline-block元素、块级元素的文字内容

利用此特性,可以轻松实现文字环绕功能

1
2
3
4
5
6
7
8
9
10
11
div {
background-color: #f00;
width: 300px;
border: 1px solid #333;
}

div img {
float: left;

margin: 8px;
}

浮动的规则三

行内级元素、inline-block元素浮动后,其顶部将与所在行的顶部对齐

1
2
3
4
5
6
7
8
9
10
11
12
13
14
15
16
17
18
19
20
21
.box {
width: 300px;
background-color: #f00;
}

.box .img1 {
float: left;
}

.box .img2 {
float: left;
}

.inner {
/* 浮动元素/定位元素/display三者的关系 */
float: left;

width: 50px;
height: 50px;
background-color: orange;
}

浮动前面规则的理解

1
2
3
4
5
6
7
8
9
10
11
12
13
14
15
16
17
18
19
20
21
22
23
24
25
26
27
28
29
30
31
32
33
<!-- 
1>三者之间的关系:
position:absolute/fixed和float:left/right和display之间的关系
2>现象解释:
1.inner2进行左浮动/右浮动的时候, 只会在当前自己行中浮动
2.inner1进行左浮动时, inner2在没有浮动时, inner会如何排布
3.inner1进行左浮动时, inner2在没有浮动时, 但是里面有文本, 文本会如何排布
4.inner1进行左浮动时, inner2设置为inline-block, inner2会在第一行, 并且被推出去
5.inner1进行左浮动时, inner2也进行左浮动, 那么innner1inner2以此在第一行排布
6.inner1inner2都进行浮动, 但是父元素没有设置高度, 那么父元素的高度会消失(高度的坍塌)
-->

.box {
/* height: 300px; */
background-color: #f00;
}

.inner1 {
float: left;

width: 100px;
height: 100px;
background-color: orange;
}

.inner2 {
float: left;
/* display: inline-block; */

width: 150px;
height: 150px;
background-color: purple;
}

浮动的规则四

如果元素是向左(右)浮动,浮动元素的左(右)边界不能超出包含块的左(右)边界

1
2
3
4
5
6
7
8
9
10
11
12
13
14
15
16
17
18
19
20
21
22
    <style>
.box {
width: 300px;
height: 300px;
background-color: #f00;
}

.inner {
width: 100px;
height: 100px;
background: orange;
float: right;
}
</style>

<body>

<div class="box">
<div class="inner"></div>
</div>

</body>

浮动的规则五

浮动元素之间不能层叠

如果一个元素浮动,另一个浮动元素已经在那个位置了

后浮动的元素将紧贴着前一个浮动元素(左浮找左浮,右浮找右浮)

如果水平方向剩余的空间不够显示浮动元素,浮动元素将向下移动,直到有充足的空间为止

1
2
3
4
5
6
7
8
9
10
11
12
13
14
15
16
17
18
19
20
21
22
23
24
25
26
27
28
29
30
31
32
33
34
35
36
37
38
39
40
41
42
    <style>
.box {
width: 300px;
height: 500px;
background-color: #f00;
}

.inner1 {
float: left;

width: 100px;
height: 100px;
background: orange;
}


.inner2 {
float: left;

width: 150px;
height: 150px;
background: purple;
}

.inner3 {
float: left;

width: 200px;
height: 200px;
background-color: yellowgreen;
}
</style>
</head>
<body>

<div class="box">
<div class="inner1"></div>
<div class="inner2"></div>
<div class="inner3"></div>
</div>

</body>

浮动的规则六

浮动元素的顶端不能超过包含块的顶端,也不能超过之前所有浮动元素的顶端

1
2
3
4
5
6
7
8
9
10
11
12
13
14
15
16
17
18
19
20
21
22
23
24
25
26
27
28
29
30
31
32
33
34
35
36
37
38
39
40
41
42
    <style>
.box {
width: 300px;
height: 500px;
background-color: #f00;
}

.inner1 {
float: left;

width: 200px;
height: 100px;
background: orange;
}


.inner2 {
float: left;

width: 150px;
height: 150px;
background: purple;
}

.inner3 {
float: right;

width: 50px;
height: 200px;
background-color: yellowgreen;
}
</style>
</head>
<body>

<div class="box">
<div class="inner1"></div>
<div class="inner2"></div>
<div class="inner3"></div>
</div>

</body>

inline-block水平布局的缺陷

浮动的应用

浮动常用的场景

  1. 解决行内级元素、inline-block元素的水平间隙问题
  2. 布局

浮动的练习

京东案例

案例一 :左右分布

1
2
3
4
5
6
7
8
9
10
11
12
13
14
15
16
17
18
19
20
21
22
23
24
25
26
27
28
29
30
31
32
33
    <style>
.container {
width: 990px;
height: 500px;
background-color: #f00;

margin: 0 auto;
}

.section {
float: left;
width: 490px;
height: 300px;
}

.section1 {
background-color: #0f0;
margin-right: 10px;
}

.section2 {
background-color: #00f;
}
</style>
</head>
<body>

<div class="container">
<div class="section section1"></div>
<div class="section section2"></div>
</div>

</body>

案例二 : 一行放5个item的案例

1
2
3
4
5
6
7
8
9
10
11
12
13
14
15
16
17
18
19
20
21
22
23
24
25
26
27
28
29
30
31
32
33
34
35
36
37
38
39
40
41
42
43
44
45
46
47
48
49
50
51
52
53
54
55
56
57
58
59
60
61
62
63
64
65
66
67
    <style>
/* 前提: border-width和padding-width为0 */
/* width of block = content-width + margin-left + margin-right + padding+border */
/* 990 = content-width + 0 + -10px */
/* content-width = 990 + 10 -> 1000 */
.container {
width: 990px;
height: 500px;
background-color: #f00;

margin: 0 auto;
}

/* 0 + 0 + 0 + width + 0 + 0 + -10 = 990 */
/* width: 990+10 = 1000 */

.wrap {
margin-right: -10px;
}

.section {
float: left;

margin-top: 10px;
width: 190px;
height: 100px;
background-color: #0f0;

margin-right: 10px;
}

/* div .section:nth-child(5n) {
margin-right: 0;
} */

/* .section5, .section10 {
margin-right: 0;
} */

/* .section1, .section2, .section3, .section4, .section5 {
margin-right: 10px;
} */
</style>
</head>
<body>

<div class="container">
<div class="wrap">
<div class="section section1"></div>
<div class="section section2"></div>
<div class="section section3"></div>
<div class="section section4"></div>
<div class="section section5"></div>
<div class="section section6"></div>
<div class="section section7"></div>
<div class="section section8"></div>
<div class="section section9"></div>
<div class="section section10"></div>
<div class="section section6"></div>
<div class="section section7"></div>
<div class="section section8"></div>
<div class="section section9"></div>
<div class="section section15"></div>
</div>
</div>

</body>

案例三: 左边两个大的item, 右边四个小的item

  • 主要目的: 中间层加负margin(最优解)
1
2
3
4
5
6
7
8
9
10
11
12
13
14
15
16
17
18
19
20
21
22
23
24
25
26
27
28
29
30
31
32
33
34
35
36
37
38
39
40
41
42
43
44
45
46
47
48
49
50
51
52
53
54
55
56
57
58
    <style>
.container {
width: 990px;
/* height: 306px; */
height: auto;
background-color: #f00;
margin: 0 auto;
}

.wrap {
margin-right: -10px;
}

.item {
float: left;

margin-right: 10px;
width: 240px;
background-color: orange;
}

.itema {
height: 306px;
}

.itemb {
height: 148px;
}

.item-last {
margin-top: 10px;
}
</style>
</head>
<body>

<div class="container">
<div class="wrap">
<div class="item itema"></div>

<div class="item itemb"></div>
<div class="item itemb item-last"></div>
</div>
</div>

<p>其他内容</p>
<p>其他内容</p>
<p>其他内容</p>
<p>其他内容</p>
<p>其他内容</p>
<p>其他内容</p>
<p>其他内容</p>
<p>其他内容</p>

</body>

考拉案例(边框的布局)

案例一 : 品牌布局

1
2
3
4
5
6
7
8
9
10
11
12
13
14
15
16
17
18
19
20
21
22
23
24
25
26
27
28
29
30
31
32
33
34
35
36
37
38
39
40
41
42
43
44
45
46
47
48
49
50
51
52
53
54
55
56
57
58
59
60
61
62
63
64
65
66
67
68
69
70
71
72
73
74
75
76
77
78
79
80
81
82
83
84
    <style>
/* CSS reset */
h2 {
margin: 0;
padding: 0;
}

a {
text-decoration: none;
color: #666;
}

.f-left {
float: left;
}

.f-right {
float: right;
}

/* 样式相关 */
.header {
width: 1100px;
margin: 0 auto;
/* background-color: #0f0; */
height: 49px;
}

.header-left {
/* float: left; */
font-size: 14px;
}

.header-left h2, .header-left span, .header-left a {
float: left;
margin-right: 20px;
}

.header-left h2 {
font-size: 22px;
}

.header-left .search {
margin-top: 9px;
}

.header-left .search a:hover {
text-decoration: underline;
}

.header-left .search .hot {
color: #ff080f;
}

.header-right {
/* float: right; */
margin-top: 9px;
font-size: 14px;
}

.header-right a:hover {
text-decoration: underline;
}
</style>
</head>
<body>

<div class="header">
<div class="header-left f-left">
<h2>美妆专区</h2>
<div class="search f-left">
<span>热搜词:</span>
<a href="#">面膜</a>
<a class="hot" href="#">口红</a>
<a href="#">眼霜</a>
<a class="hot" href="#">精华</a>
<a href="#">卸妆</a>
</div>
</div>
<div class="header-right f-right">
<a href="#">更多好货 ></a>
</div>
</div>

案例二: 热卖品牌

1
2
3
4
5
6
7
8
9
10
11
12
13
14
15
16
17
18
19
20
21
22
23
24
25
26
27
28
29
30
31
32
33
34
35
36
37
38
39
40
41
42
43
44
45
46
47
48
49
50
51
52
53
54
55
56
57
58
59
60
    <style>
/* css reset */
ul {
list-style: none;
padding: 0;
margin: 0;
}

/* 样式 */
.brand {
width: 1100px;
height: 180px;
margin: 0 auto;
/* background-color: #f00; */
}

.brand ul {
margin-right: -10px;
}

.brand ul li {
float: left;
width: 219px;
height: 167px;
/* background-color: yellowgreen; */
margin-right: -1px;

border: 1px solid #eaeaea;
}

span {
background-color: #f00;
float: left;

margin-right: -20px;
}

strong {
background-color: #0f0;
float: left;
}

</style>
</head>
<body>

<div class="brand">
<ul>
<li></li>
<li></li>
<li></li>
<li></li>
<li></li>
</ul>
</div>

<span>span元素</span>
<strong>strong元素</strong>

</body>

案例三:今日限时购

1
2
3
4
5
6
7
8
9
10
11
12
13
14
15
16
17
18
19
20
21
22
23
24
25
26
27
28
29
30
31
32
33
34
35
36
37
38
39
40
41
42
43
44
45
46
47
48
49
50
51
52
53
54
55
56
57
58
59
60
61
62
63
64
    <style>
ul {
list-style: none;
margin: 0;
padding: 0;
}

/* 布局样式 */
.today {
width: 1100px;
margin: 0 auto;
}

.today ul {
margin-right: -3px;
}

.today ul li {
float: left;
width: 420px;
height: 190px;
background-color: #f00;

border: 1px solid #333;
margin-right: -1px;
margin-bottom: -1px;
}

.today ul .last {
float: right;
width: 260px;
height: 381px;
background-color: #0f0;
}

</style>
</head>
<body>

<div class="today">
<ul>
<li class="last"><a href="#"></a></li>
<li></li>
<li></li>
<li></li>
<li></li>
</ul>
</div>
<br><br><br><br>
<br><br><br><br>
<br><br><br><br>
<br><br><br><br>
<br><br><br><br>
<br><br><br><br>
<br><br><br><br>
<br><br><br><br>
<br><br><br><br>
<br><br><br><br>
<br><br><br><br>
<br><br><br><br>
<br><br><br><br>
<br><br><br><br>

</body>

浮动存在的问题

由于浮动元素脱离了标准流,变成了脱标元素,所以不再向父元素汇报高度

父元素计算总高度时,就不会计算浮动子元素的高度,导致了高度坍塌的问题

解决父元素高度坍塌问题的过程,一般叫做清浮动(清理浮动、清除浮动)

清浮动的目的是

让父元素计算总高度的时候,把浮动子元素的高度算进去

清除浮动的常见方法

  1. 给父元素设置固定高度
    扩展性不好(不推荐)

  2. 在父元素最后增加一个空的块级子元素,并且让它设置clear: both
    会增加很多无意义的空标签,维护麻烦
    违反了结构与样式分离的原则(不推荐)

  3. 在父元素最后增加一个br标签:

    会增加很多无意义的空标签,维护麻烦
    违反了结构与样式分离的原则(不推荐)

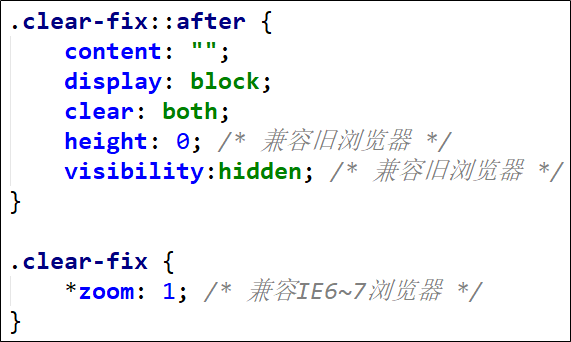
  4. 给父元素增加::after伪元素
    纯CSS样式解决,结构与样式分离(推荐)

    image-20200327193949253

CSS属性-clear

clear的常用取值

  1. left:要求元素的顶部低于之前生成的所有左浮动元素的底部
  2. right:要求元素的顶部低于之前生成的所有右浮动元素的底部
  3. both:要求元素的顶部低于之前生成的所有浮动元素的底部
  4. none:默认值,无特殊要求

一般就只用在非浮动元素上,可以让非浮动元素与浮动元素不层叠

1
2
3
4
5
6
7
8
9
10
.clear-fix::after {
content: "";
display: block;
clear: both;
height: 0;
visibility: hidden;
}
.clear-fix {
*zoom: 1;
}

定位方案对比

image-20200327194205936

CSS属性-transform

允许你旋转,缩放,倾斜或平移给定元素。
常见的函数transform function有:

  1. 平移:translate(x, y)
  2. 缩放:scale(x, y)
  3. 旋转:rotate(deg)
  4. 倾斜:skew(deg, deg)

位移-translate

平移:translate(x, y)

一个值时,设置x轴上的位移

二个值时,设置x轴和y轴上的位移

值类型:

数字:100px

百分比:参照元素本身( refer to the size of bounding box )

1
2
3
4
5
6
7
8
9
10
11
12
13
14
15
16
17
18
19
20
21
22
23
24
    <style>
.box {
width: 180px;
height: 100px;
background-color: #f00;
}

.box:hover {
/* transform: translate(30px); */
/* 90px */
transform: translate(50%);
}

.box1 {
transform: translate(90px);
}
</style>
</head>
<body>

<div class="box"></div>
<div class="box box1"></div>

</body>

缩放-scale

缩放:scale(x, y)

一个值时,设置x轴和y轴相同的缩放

二个值时,设置x轴和y轴上的缩放

值类型:

数字:
1:保持不变
2:放大一倍
0.5:缩小一半

百分比:不支持百分比

1
2
3
4
5
6
7
8
9
10
11
12
13
14
15
16
17
18
19
    <style>
.box {
width: 100px;
height: 100px;
background-color: #f00;

margin: 100px auto 0;
}

.box:hover {
transform: scale(2);
}
</style>
</head>
<body>

<div class="box"></div>

</body>

transform-origin

变形的原点:

一个值时,设置x轴的原点

两个值时,设置x轴和y轴的原点

必须是<length>,<percentage>,或 left, center, right, top, bottom关键字中的一个

left, center, right, top, bottom关键字

length:从左上角开始计算

百分比:参考元素本身大小

1
2
3
4
5
6
7
8
9
10
11
12
13
14
15
16
17
18
19
20
    <style>
.box {
width: 100px;
height: 100px;
background-color: #f00;

margin: 100px auto 0;
transform-origin: 10px top;
}

.box:hover {
transform: scale(2);
}
</style>
</head>
<body>

<div class="box"></div>

</body>

旋转-rotate

旋转:rotate(deg)

一个值时,表示旋转的角度

值类型:

deg:旋转的角度

正数为顺时针

负数为逆时针

注意:旋转的原点受transform-origin的影响

1
2
3
4
5
6
7
8
9
10
11
12
13
14
15
16
17
18
19
20
    <style>
.box {
width: 100px;
height: 100px;
background-color: #f00;

margin: 100px auto 0;
}

.box:hover {
/* deg: degree */
transform: rotate(-90deg);
}
</style>
</head>
<body>

<div class="box">哈哈哈</div>

</body>

倾斜-skew

旋转:skew(x, y)

值个数

一个值时,表示x轴上的倾斜

二个值时,表示x轴和y轴上的倾斜

值类型:

deg:旋转的角度

正数为顺时针

负数为逆时针

注意:旋转的原点受transform-origin的影响

1
2
3
4
5
6
7
8
9
10
11
12
13
14
15
16
17
18
19
    <style>
.box {
width: 100px;
height: 100px;
background-color: #f00;

margin: 100px auto 0;
}

.box:hover {
transform: skew(50deg, 50deg)
}
</style>
</head>
<body>

<div class="box">哈哈哈</div>

</body>

CSS属性-transition

transition过渡动画是以下四个属性的简写。

  1. transition-property:指定应用过渡属性的名称
    可以写all表示所有可动画的属性
    属性是否支持动画查看文档

  2. transition-duration:指定过渡动画所需的时间

    单位可以是秒(s)或毫秒(ms)

  3. transition-timing-function:指定动画的变化曲线

    https://developer.mozilla.org/zh-CN/docs/Web/CSS/transition-timing-function

  4. transition-delay:指定过渡动画执行之前的等待时间

1
2
3
4
5
6
7
8
9
10
11
12
13
14
15
16
17
18
19
20
21
22
23
24
25
26
27
28
29
    <style>
.box {
width: 100px;
height: 100px;
background-color: #f00;

margin: 100px auto 0;


/* transition: 值1 transition-property:transform/width/height/all
值2 transition-duration: 100ms(毫秒)/1s(秒)
值3 transition-timing-function: 动画的变化速度: ease/ease-in
值4 transition-delay: 延迟/等待多久再执行这个动画; */
transition: all 300ms linear;
}

.box:hover {
/* width: 200px;
height: 200px; */
/* transform: scale(2) */
transform: rotate(180deg)
}
</style>
</head>
<body>

<div class="box"></div>

</body>

CSS属性-vertical-align

文本的baseline是字母x的下方

Inline-block默认的baseline是margin-bottom的底部(没有,就是盒子的底部)

Inline-block有文本时,baseline是最后一行文本的x的下方

vertical-align有四个取值

  1. baseline(默认值):基线对齐
  2. top:把行内级盒子的顶部跟line boxes顶部对齐
  3. middle:行内级盒子的中心点与父盒基线加上x-height一半的线对齐
  4. bottom:把行内级盒子的底部跟line box底部对齐
    <percentage>:把行内级盒子提升或者下降一段距离(距离相对于line-height计算\元素高), 0%意味着同baseline一样
    <length>:把行内级盒子提升或者下降一段距离,0cm意味着同baseline一样

十五. flex布局

3.1. flex-container:

  • display: flex/inline-flex
    • 开启flex布局
  • flex-direction:
    • 决定主轴的方向
  • justify-content:
    • 决定主轴上flex-items如何排布
  • align-items:
    • 决定flex-items在交叉轴上的对齐方式
    • normal
    • stretch
    • flex-start
    • flex-end
    • center
    • baseline
  • flex-wrap:
    • nowrap
    • wrap
  • flex-flow:
    • flex-direction
    • flex-wrap

3.2.flex-items:

  • order
  • align-self
  • flex-grow
  • flex-shrink
  • flex-basis
  • flex

flex布局

image-20200915180112899

容器属性

  1. display 布局

    display:flex/inline-flex

  2. flex-direction 决定主轴方向

    flex-direction:row 默认值,主轴水平方向,起点在左端

    flex-direction:row-reverse 主轴水平方向,起点在右端

    flex-direction:column 主轴垂直方向,起点在上沿

    flex-direction:column-reverse 主轴垂直方向,起点在下沿

  3. flex-wrap 换行

    flex-wrap:nowrap 默认值,不换行

    flex-wrap:wrap 换行,第一行在上方

    flex-wrap:wrap-reverse 换行,第一行在下方

  4. flex-flow:<flex-direction>||<flex-wrap> 缩写属性

  5. justify-content 项目在主轴上的对齐方式

  6. align-items 项目在交叉轴上的对齐方式

  7. align-content 多根轴线的对齐方式

项目属性

  1. order 项目的排列顺序,数值越小,排列越靠前,默认为0

  2. flex-grow 项目的放大比例,默认为0

  3. flex-shrink 项目的缩小比例,默认为1

  4. flex-basis 在分配多余空间之前,项目占据的主轴空间

  5. flex:<flex-grow><flex-shrink>?||<flex-basis> 简写属性

  6. align-self 允许单个项目有与其他项目不一样的对齐方式

flex-direction设置成了column之后相应的justify-content也将变为竖直方向

对于一行分布两边的布局

  1. 使用justify-content:space-between直接实现
  2. 还可以设置margin-left:auto/margin-right:auto;

flex和grid布局

今天彻底完成了flex布局的,然后看了阮一峰的博客汲取到了很多有用的东西。

学到了很多在以后工作中会用到的知识。

接下来的抓紧时间掌握JavaScript、React,完成两个项目之后开始投简历面试。

flex布局结合nth-child一起使用效果更佳。

Grid
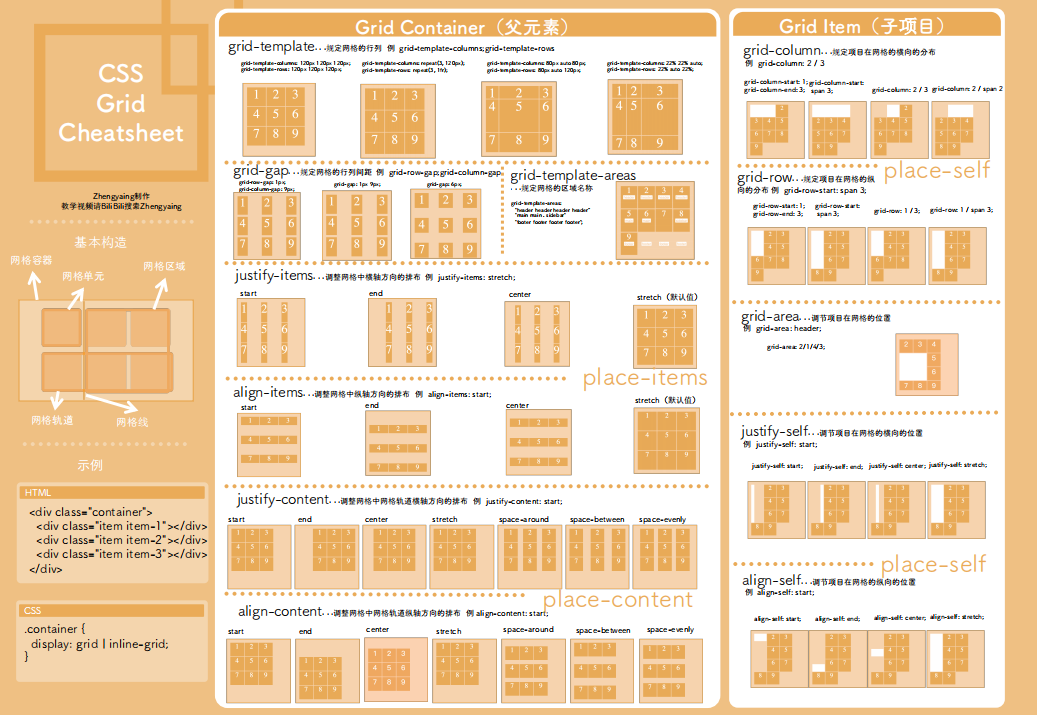
image-20200915180406033

容器属性

  1. display 布局

    display:grid/inline-grid

  2. grid-template-columns 列宽

    grid-template-rows 行高

    • 宽度单位

      百分比

      repeat(2,100px 20px 80px)

      auto-fill 自动填充

      fr 比例

      minmax(100px,1fr) 长度范围,不小于100px,不大于1fr

      auto 自己决定

  3. grid-row-gap 行间距

    grid-column-gap 列间距

    gird-gap:<grid-column-gap> <grid-row-gap> 简写属性

  4. grid-template-areas 区域

    1
    2
    3
    grid-template-areas:'a b c'
    'd e f'
    'g h i'
  5. grid-auto-flow 放置顺序

    grid-auto-flow:row 默认值,先行后列

    grid-auto-flow:row dense 先行后列,并且尽可能紧密填满

    grid-auto-flow:column 先列后行

    grid-auto-flow:column dense 先列后行,并且尽可能紧密填满

  6. justify-items 设置单元格内容的水平位置

    align-items 设置单元格内容的垂直位置

    place-items:<align-items> <justify-items> 简写属性

  7. justify-content 整个内容区域在容器里面的水平位置

    align-content 整个内容区域在容器里面的垂直位置

    place-content:<align-content> <justify-content> 简写属性

  8. grid-auto-columns 浏览器自动创建的多余网格的列宽

    grid-auto-rows 浏览器自动创建的多余网格的行高

项目属性

  1. gird-column-start 左边框所在的垂直网格线

    gird-column-end 右边框所在的垂直网格线

    gird-row-start 上边框所在的垂直网格线

    gird-row-end 下边框所在的垂直网格线

  2. grid-column:<grid-column-start>/<grid-column-end> 简写形式

    grid-column:1/3 从第1根列线到第3根列线

    grid-column:1/span 2 从第1根列线跨越2个网格

    grid-row:<grid-row-start>/<grid-row-end> 简写形式

  3. grid-area:<row-start>/<column-start>/<row-end>/<column-end>

    指定放在哪一个区域

  4. justify-self 设置单元格内容的水平位置

    align-self 设置单元格内容的垂直位置

    place-self:<align-self><justify-self> 简写形式